��Դ:zcool ����:edlang ����
Master Photoshop��s Vector Capabilities: Create a Detailed Microphone Illustration
��ʦ��psʸ������������һ������ϸ�ڵ���˷�
By Andrei Marius, 11th February, 2013, 5 Comments
���룺Steve Woolf
ԭ�ĵ�ַ��http://psd.fanextra.com/tutorials/master-photoshops-vector-capabilities-create-a-detailed-microphone-illustration/

��������Ӣ�IJο���overlay���� soft light��� normal���� angle�Ƕ� multiply��Ƭ����
ע���Ҳ���Ӣ��רҵ�ģ������Լ�����ķ�������������Ϣʱ�䣬һ���˶�����ɵģ������в���ĵط������½⣬��æ�����������ǹ�ͬѧϰ��
���̵̳�ԭ���߱�д�̳���ķdz����棬���ż�ʹ��psС���Ų���Ҳ��ȫ��������99%�ij̶ȡ�
����������ĺ����࣬���ϻ�Ҫһ���о�ԭ�̵̳��������϶��������˲��һ�ܵ�ʱ��ɡ�
����Ҳ������һЩ�Լ������⡣
����Ҳ�����кܴ����ʾ��������ʹ���е�һЩ���Ͻ���ϰ����ҲҪ�ĵ���
����㿪ʼ�ˣ�������ѧϰ�꣬�����б��������ж�Ķ��֪ʶ������ȥ���ա�
If you��re really comfortable in Photoshop you may love creating stuff like photo manipulations, website layouts and other graphics.
�����ʹ��Photoshop��ĺ����ģ������ϲ�����춫��������Ƭ�����Σ���վ��ƺ�����ƽ����ƵĶ�����
However, there��s a good chance that you��ve never bothered to master vector design. Often Photoshop users will simply assume that it��s something reserved for Illustrator pros, and Illustrator can be too time consuming to learn, or too expensive to buy.
��������û�в�м������ʸ����ƵĻ���������һ���ܺõĻ��ᡣPhotoshop�û��ᾭ����Ϊʸ��ͼ��Ӧ�ø�ʹ��Illustrator��רҵ��ʿ������Illustrator����ѧϰ����̫��ʱ�ˣ��ֻ��߹�������̫���ˡ�
Many people end up outsourcing vector work, which puts a big whole in their pocket.
�ܶ����������ʸ���Ĺ�������Ҫ�������Ǻܴ�һ�ʿ�֧��
Wouldn��t you rather master vector design in the software you��re already familiar with �C Photoshop?
��ϣ�������Ѿ���Ϥ��Photoshop������ʸ����Ƶķ�����
Photoshop actually has some really powerful vector capabilities, and today you��ll learn them, for free.
Photoshop����ʵ��һЩ�dz�ǿ���ʸ�����ܣ�����������ѵ��˽���ǡ�
You��ll be creating a detailed microphone illustration that��s totally vector based. You��ll master things like smart objects, warping your vector shapes, creating custom patterns, textures, lighting and more, all within a clean, non-destructive vector workflow.
�㽫��������ȫ��ʸ�������Ƶ���˷硣�㽫���յĶ����������ܶ�����ʸ����״�������Զ���ͼ���������������ȵȣ������������ģ������ʸ���������̡�
Let��s dive right in!
�����ǿ�ʼ�ɣ�
Step1
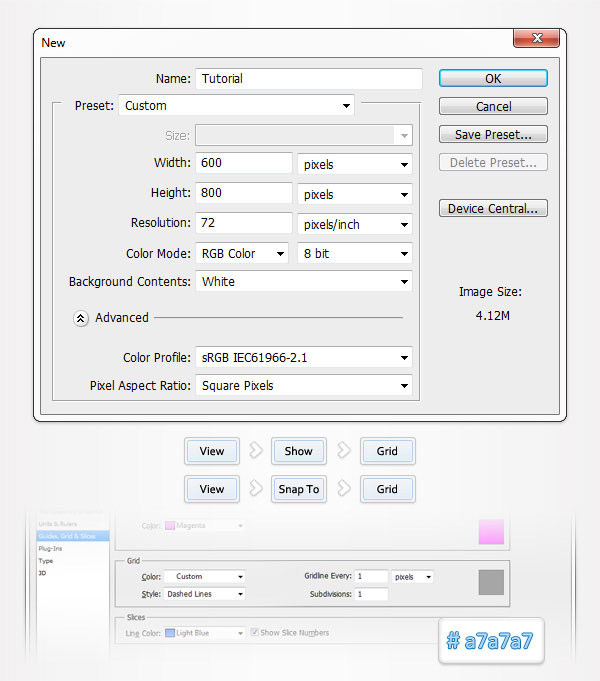
Open Photoshop and hit Control + N to create a new document. Enter all the data shown in the following image and click OK. Enable the Grid (View > Show > Grid) and the Snap to Grid (View > Snap To > Grid). For the moment you need a grid every 5px. Go to Edit > Preferences > Guides, Grid & Slices and focus on the Grid section. For starters you will need a grid every 1px. Simpy enter 1 in the Gridline Every box and 1 in the Subdivision box. Also, set the color of the grid at #a7a7a7. Once you set all these properties click OK. Don��t get discouraged by all that grid. It will ease your work later. You should also open the Info panel (Window > Info) for a live preview with the size and position of your shapes.
��Photoshop�����Control + N����һ�����ĵ���������������ͼ��ʾ�����ݣ�Ȼ��ȷ�����������鿴>��ʾ>���Ͷ���������ͼ>����>����
��ʱ������Ҫÿһ��5px��������༭>��ѡ��>�ο��ߡ��������Ƭ�����쿴���֡�һ��ʼ������Ҫÿһ��1px�������������������1��������������1�����⣬�����������ɫΪ��a7a7a7��һ�������ú�������Щ���Ե���ȷ������Ҫ��Ϊ������Щ����û���ô���֮�����������Ĺ�����
��ҲӦ��ΪʵʱԤ��������״�Ĵ�С��λ�ô���Ϣ��壨����>��Ϣ����
Step2
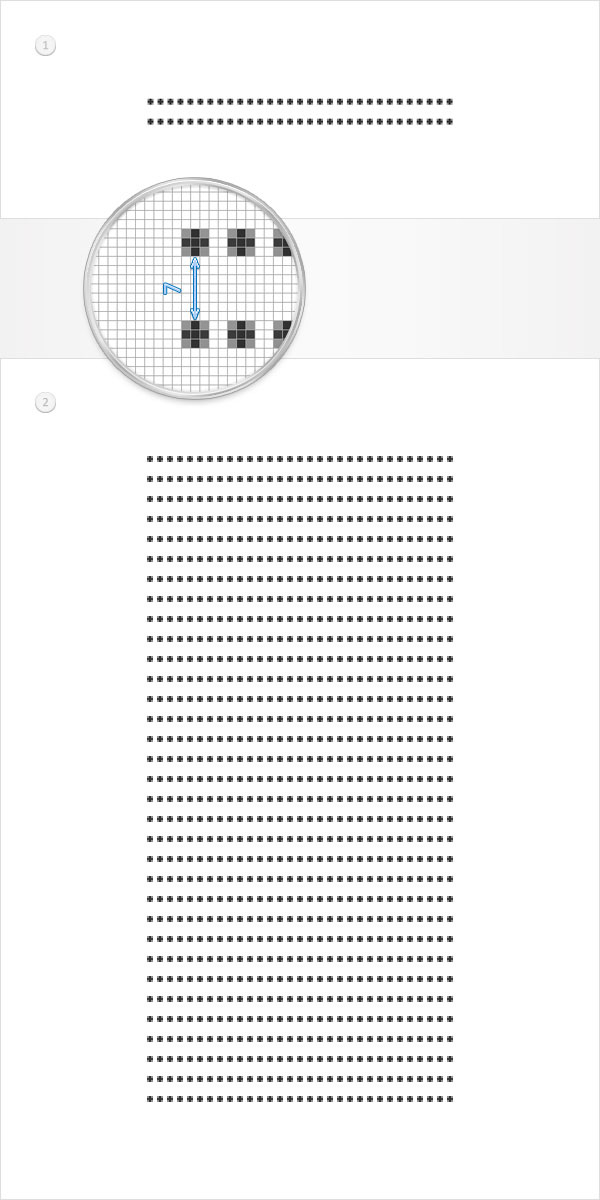
Set the foreground color at #323232, pick the Ellipse Tool and create a 3px circle. Make sure that this little vector shape is selected, switch to the Direct Selection Tool and select the four anchor points that make up your shape. Hold Alt, click inside this shape and drag it 5px to the right. In the end things should look like in the second image. Repeat this technique until you have a row with thirty one circles.
����ǰ��ɫΪ��323232��ѡ����Բ���ߣ�������һ��3px��ԲȦ���л���ֱ��ѡ��ѡ�������״���ĸ���λ�㡣��סAlt������������״�ڲ��������϶���5PX�����Ӧ������ͼ2�е����ӡ�������������ֱ��һ����31��ԲȦ����ע����Ҳ����סAlt��Control��t���������ƶ�5�����أ��ٰ�סAlt��Control��shift��t���ظ�ǰ��IJ���������һ��31��Բ�Ρ��ر�ע�⣺���ϲ���������һ��ͼ������ɵģ�

Step3
Focus on the shape made in the previous step and make sure that the Direct Selection Tool is still active. Select all the anchor points that make up the vector shape made in the previous step, hold Alt, click inside some of those circles and drag a copy 7px down as shown in the first image. Repeat this technique until you have thirty-three rows.
�鿴�ϼ�����������״����ȷ����Ȼ��ֱ��ѡ��ѡ�С�ѡ����һ����������ʸ����״������ê�㣬��סAlt�����������ԲȦ���ڲ����������϶�������7px��������һ��ͼ��ʾ���ظ�����ֱ������33�С���ע���������ϲ��ķ��������ƶ����ƹ�33�ţ�ÿ�ż��7���أ���
Step4
Reselect the vector edited in the previous step. Pick the Ellipse Tool, check the Add button from the top and draw a new 3px circle and place it between the top rows as shown below. Focus on this new circle, select it using the Direct Selection Tool, make a copy and drag it five pixels to the right. Repeat this technique until you have a row with 30 circles as shown in the following image.
����ѡ����ǰ�IJ����б༭��ʸ��ͼ�Ρ�ѡ����Բ���ߣ����������ĺϲ���״��ť��������һ���µ�3px��Ȧ���������������������֮�䣬����ͼ��ʾ���鿴�µ�ԲȦ��ʹ��ֱ��ѡ��ѡ���������Ҹ����ƶ�5PX��������������ֱ��һ����30��ԲȦ.

Step5
Keep focusing on the existing vector shape, select the row of circles added in the previous step made a copy and drag it 10px down. Repeat these technique thirty more times. In the end things should look like in the following image.
�鿴���е�ʸ����״��ѡ������һ�����������е�ԲȦ�������������ƶ�����10px���ظ�����ֱ������32�С����������Ӧ������ͼ���ر�ע�⣺���ϲ���������һ��ͼ������ɵģ���ĿǰΪֹ���ϱ���ͼ��ֻ�����㣩

Step6
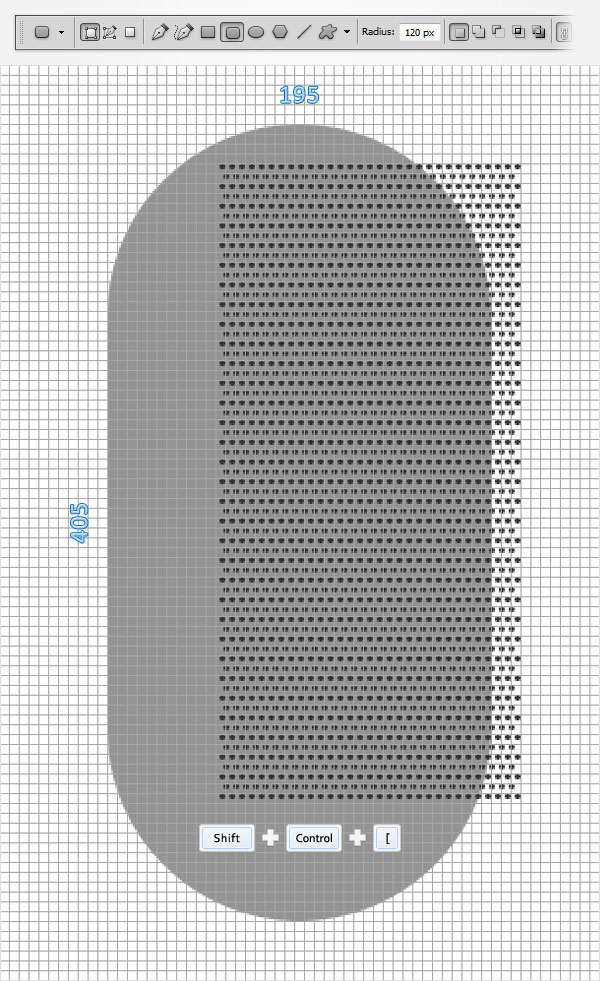
Switch to "gridline every 5px". So, simply go to Edit > Preferences > Guides, Grid & Slices and enter 5 in the Gridline Every box. Set the foreground color at #959595, pick the Rounded Rectangle Tool. Set the radius at 120px, create a 195 by 405px vector shape and send it to back (Shift + Control + [ ).
����ǰ��ķ������������á�������Ϊ5px������ǰ��ɫ����Ϊ��959595��ѡ��Բ�Ǿ��ι��ߡ�����Բ�ǰ뾶Ϊ120px������һ��195��405px��ʸ����״���������ŵ��ײ㣨��Shift+ Control + [����
Step7
Focus on the Layers panel, hold Control and click on the vector shape made in the previous step. This should load a simple selection around your shape. Keep focusing on the Layers panel, pick the Selection Tool(V) and select the complex vector shape made in the starting shapes. Move to the top bar and click on the "Align vertical centers" and "Align horizontal centers" buttons. In the end things should look like in the second image. Finally, get rid of that selection (Control + D).
ѡ��ͼ����壬��ס Control �������һ����������Բ�Ǿ���ʸ����״������ѡ�������ѡ�ߣ�V����ѡ��ͼ�������Բ��ʸ����״ͼ�㡣�����������еġ���ֱ���ж��롱�͡�����ˮƽ���ġ���ť��Բ��ʸ����״ͼ�����Բ�Ǿ���ʸ����״ͼ��Ϊ���ն��롣���Ӧ����ͼ������ʾ����ɺ�ȡ��ѡ�� Control + D����

Step8
Select the complex vector shape and go to Edit > Transform > Warp. Select Fisheye from the Warp drop-down menu, enter 40 in the Bend box and hit Enter.
ѡ��Բ��ʸ����״ͼ�㣬����༭>�任>Ť�����������˵���ѡ�����ۣ��ڶ���������ѡ��������40����Enter����

Step9
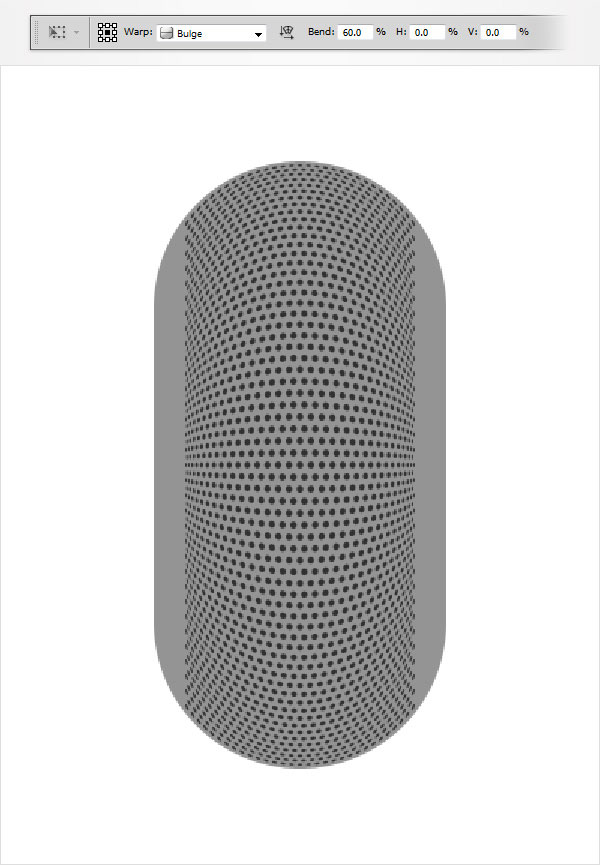
Make sure that your complex vector shape is still selected and go again to Edit > Transform > Warp. Select Bulge from the Warp drop-down menu, enter 60 in the Bend box and hit Enter.
�뱣��Բ��ʸ����״ͼ���Դ���ѡ��״̬�����ٴε���༭>�任>Ť�����������˵���ѡ�����ڶ���������ѡ��������60����Enter����
Step10
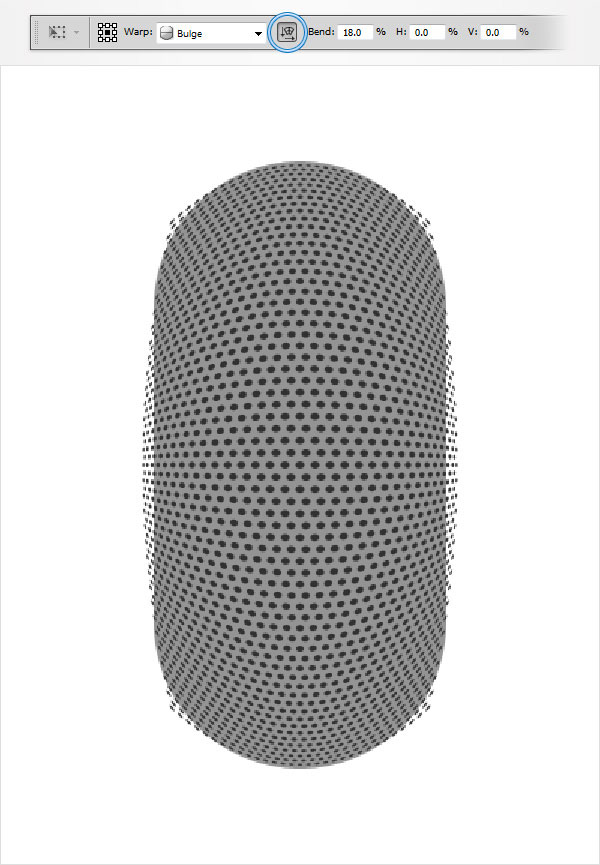
Make sure that your complex vector shape is still selected and go one more time to Edit > Transform > Warp. Select Bulge from the Warp drop-down menu, check the Orientation button, enter 18 in the Bend box and hit Enter.
�뱣��Բ��ʸ����״ͼ���Դ���ѡ��״̬�����ٴε���༭>�任>Ť�����������˵���ѡ���𣬵�����������ı��εķ���ť���ڶ���������ѡ��������18����Enter����
Step11
Move to the Layers panel, hold Control and click on the rounded rectangle made in the sixth step. Focus on this new selection and pick the Rectangular Marque Tool. Hold the Alt key from your keyboard and simply click and drag to remove the bottom half of your selection. Make sure that this selection stays active and return to the Layers panel. Reselect the complex vector shape and simpy click on the Add layer mask button. In the end your masked vector shape should look like in the second image. Don't forget to get rid of that selection (Control + D).
ѡ��ͼ����壬��ס Control�����Բ�Ǿ���ͼ�㡣�������ͼ���ѡ����ѡ�����ѡ�ߡ����̰�סAlt���϶���ɾ���²�һ���ѡ��������ѡ����ѡ�е�״̬�����ص�ͼ����塣����ѡ��Բ��ʸ����״ͼ�㲢�������ͼ���ɰ水ť�������Ӧ�����·��ڶ���ͼ��ȡ��ѡ����Control + D����

Step12
Move to the Layers panel and double click on the vector shape made in the second step to open the Layer Style window. Activate the Gradient Overlay section and enter the properties shown in the following image. The white numbers from the image stand for location percentage.
ѡ��ͼ����壬˫��Բ�Ǿ���ͼ�㣬��ͼ����ʽ���ڡ�����������ѡ�Ȼ����������ͼ��ʾ�����ԡ���ͼ���еİ�ɫ���ִ�����λ�ðٷֱȡ�(ע��#c3c83d������#c3c8cd��ԭͼӦ�ñ�ע����)


Step13
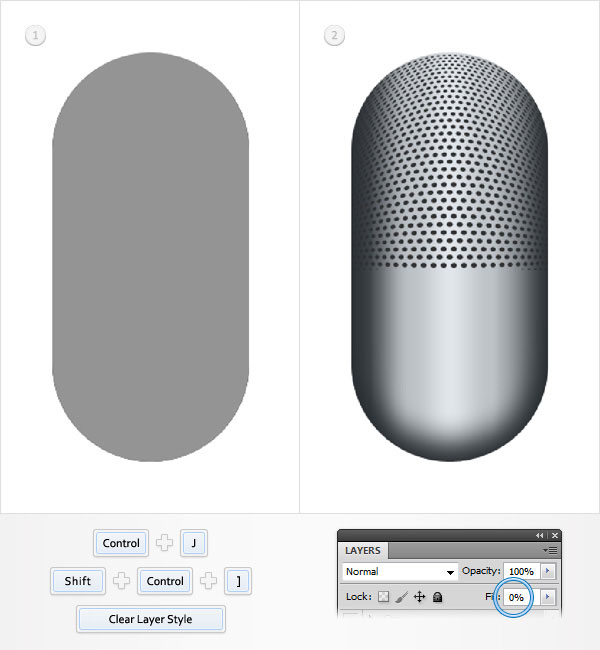
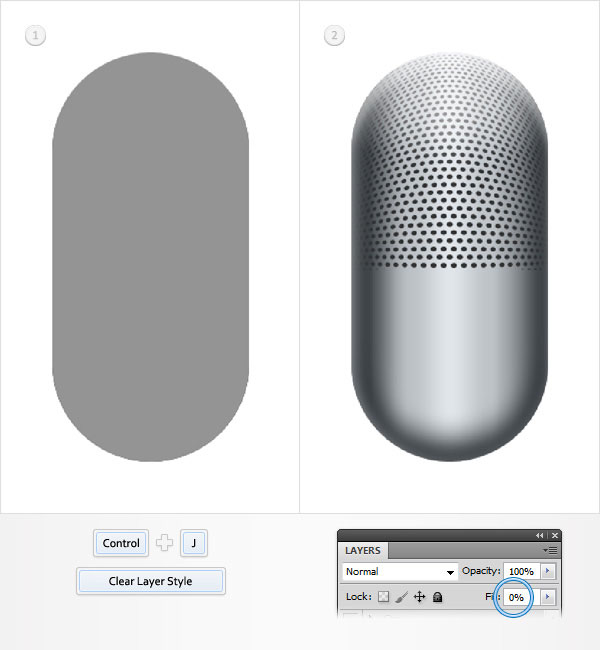
Select the vector shape edited in the previous step and duplicate it (Control + J). Focus on the Layers panel and select this copy. Bring it to front (Shift + Control + ] ) then right click on it and click on Clear Layer Style. Make sure that this copy is still selected, lower its Fill to 0% then open the Layer Style window and enter the properties shown in the following image.
ѡ��Բ�Ǿ���ʸ��ͼ�㣬���������� Control + J�����Ѹ���ͼ�����ǰ�棨��Shift+ Control +]����Ȼ���Ҽ���������Ȼ�����ͼ����ʽ����ȷ���˸����Դ���ѡ��״̬����������䵽0����Ȼ���ͼ����ʽ���ڣ�������ͼ�е����ԡ�
Step14
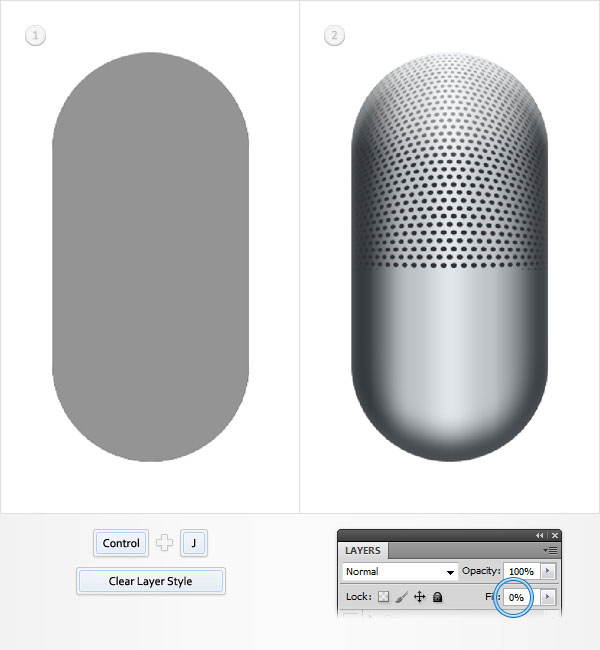
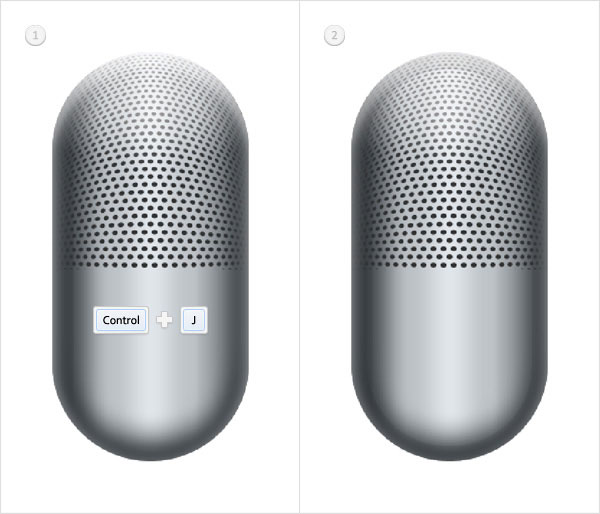
Select the vector shape edited in the previous step and duplicate it (Control + J). Focus on the Layers panel and select this copy. Clear the Layer Style, lower its Fill to 0% then open the Layer Style window and enter the properties shown in the following images.
ѡ��Բ�Ǿ���ʸ��ͼ�㣬���������� Control + J����ѡ��������������ͼ����ʽ�����������Ϊ0����Ȼ���ͼ����ʽ���ڣ�������ͼ�е����ԡ���ע��ԭ��©��һ��б�渡�������ֵ�����Բο��ҵ���ֵ��ŵ�һ�£�

Step15
Select the vector shape edited in the previous step and duplicate it (Control + J). Focus on the Layers panel and select this copy. Clear the Layer Style, lower its Fill to 0% then open the Layer Style window and enter the properties shown in the following images.
ѡ��Բ�Ǿ���ʸ��ͼ�㣬���������� Control + J����ѡ��������������ͼ����ʽ�����������Ϊ0����Ȼ���ͼ����ʽ���ڣ�������ͼ�е����ԡ�

Step16
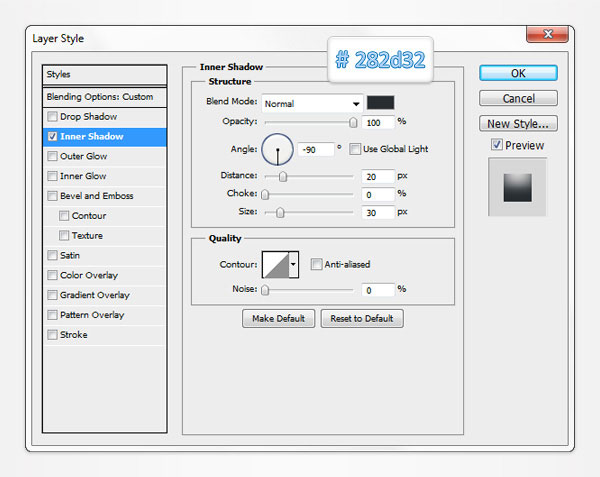
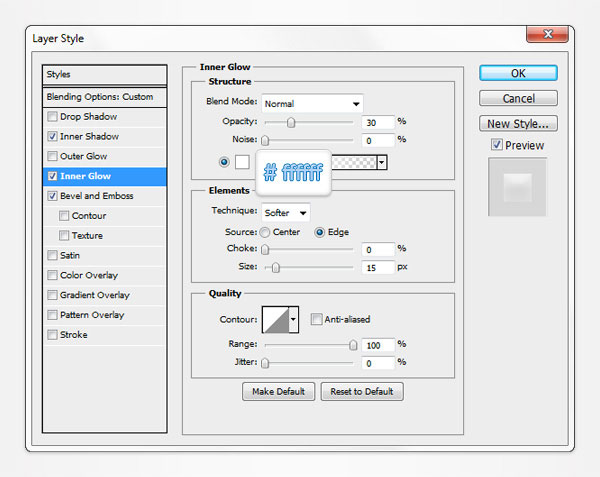
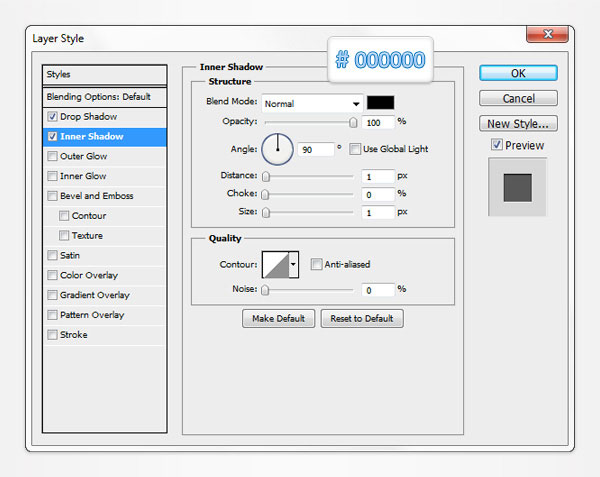
Select the vector shape edited in the previous step and duplicate it (Control + J). Focus on this copy, open the Layer Style window and edit properties used for the Inner Shadow as shown in the following image.
ѡ��Բ�Ǿ���ʸ��ͼ�㣬���������� Control + J����ѡ��������������ͼ����ʽ�����������Ϊ0����Ȼ���ͼ����ʽ���ڣ�������ͼ�е����ԡ�


step17
Select the vector shape edited in the previous step and duplicate it (Control + J). Focus on this copy, open the Layer Style window and edit properties used for the Inner Shadow as shown in the following image.
ѡ��Բ�Ǿ���ʸ��ͼ�㣬���������� Control + J����ѡ��������������ͼ����ʽ�����������Ϊ0����Ȼ���ͼ����ʽ���ڣ�������ͼ�е����ԡ�

step18
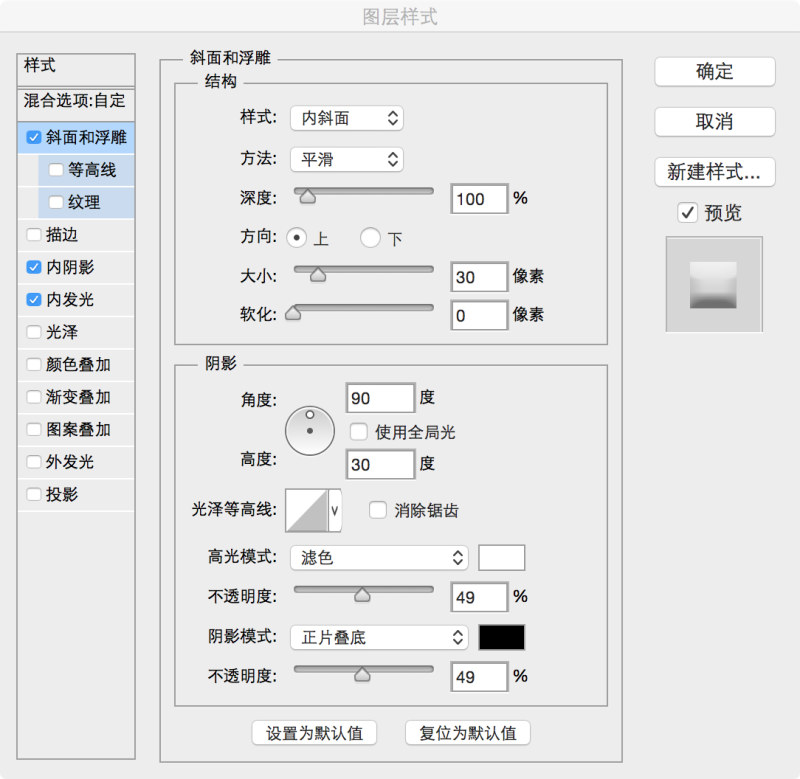
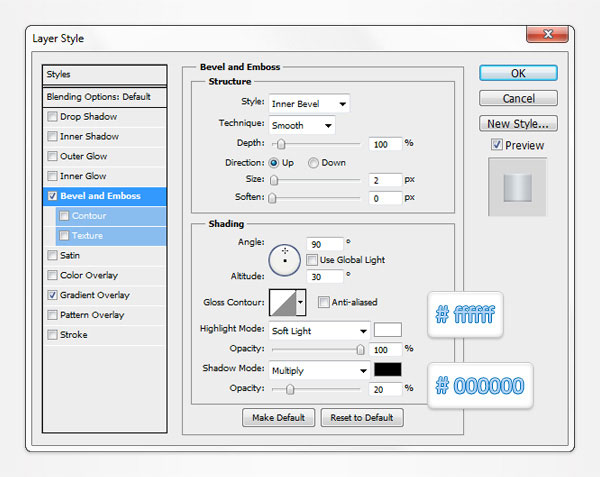
Focus on the Layers panel, open the Layer Style window for that complex vector shape and enter the properties shown in the following images.
�鿴ͼ����壬ѡ��Բ��ʸ��ͼ�㣬��ͼ����ʽ���ڣ�Ȼ��������ͼ�е����ԡ�


step19
Pick the Rounded Rectangle Tool, set the radius at 5px, create a 205 by 25px vector shape and place it as shown in the first image. Make a copy of this new shape (Control + J), select it and go to Edit > Transform > Warp. Select Bulge from the Warp drop-down menu, enter 5 in the Bend box and hit Enter. Open the Layer Style window for this new vector shape and enter the properties shown in the following images.
ѡ��Բ�Ǿ��ι��ߣ����ð뾶Ϊ5���أ�����һ��205��25���ص�ʸ����״�������������ͼ1����ʾ��λ�á�������µ���״����һ��������Control+ J����ѡ����������༭>�任>Ť�����������˵���ѡ����������ѡ��������5��Ȼ��Enter����������µ�ʸ����״��ͼ����ʽ���ڣ�Ȼ��������ͼ�е����ԡ�(ע��#c3c83d������#c3c8cd��ԭͼӦ�ñ�ע����)


Step 20
Move to the Layers panel, select the other vector shape made in the previous step and go to Edit > Transform > Warp. Select Bulge from the Warp drop-down menu, enter 10 in the Bend box and hit Enter. Open the Layer Style window for this vector shape and enter the properties shown in the following images.
�ƶ���ͼ������У�ѡ������һ���д������һ��ʸ����״������༭>�任>Ť�����������˵���ѡ����������ѡ��������10����Enter���������ʸ����״��ͼ����ʽ���ڣ�Ȼ��������ͼ�е����ԡ�(ע�����Ը�����һ������ͼ����ʽ��ֻ�ø�б�渡���еĴ�С��ֵ����


Step 21
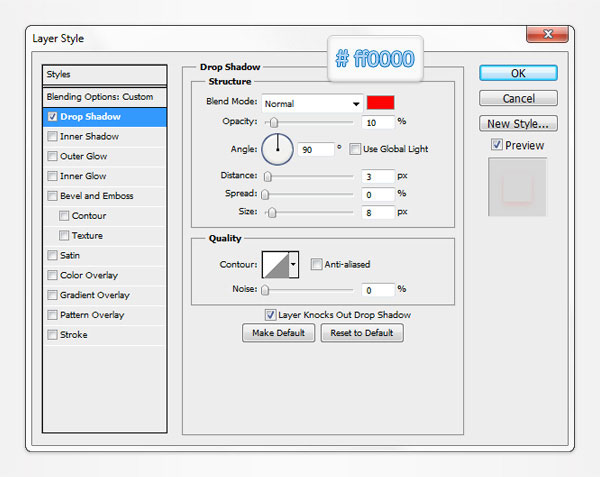
Select the vector shape edited in the previous step and duplicate it (Control + J). Focus on the Layers panel and select this copy. Clear the Layer Style, lower its Fill to 0% then open the Layer Style window and enter the properties shown in the following image. The light red used for the Drop Shadow will make it easier for you to understand the techniques that we��ll use in the next step.
ѡ������һ���༭��ʸ����״������������Control+ J�����鿴ͼ����壬ѡ������������������ͼ����ʽ�����������Ϊ0����Ȼ���ͼ����ʽ���ڣ�Ȼ����������ͼ��ʾ�����ԡ�ʹ�õ���ɫ����Ӱ����������������������һ�����������顣��ע����ɫ������Ӧ����100%��

Step 22
Load a new selection around the rounded rectangle made in the sixth step. Select the vector shape made in the previous step and click on the Add layer mask button. Also, open the Layer Style window for this masked vector shape and check the Layer Mask Hidden Effects box. In the end your masked vector shape should look like in the third image. Re-open the Layer Style window and simply replace the red used fro the Drop Shadow effect with a flat black.
���ص�������Բ�Ǿ��ε�ѡ����ѡ������һ����������ʸ����״��Ȼ������ͼ���ɰ水ť�����⣬�����ʸ���ɰ�ͼ���ͼ����ʽ���ڲ�ѡ�У�ͼ���ɰ�����Ч����ѡ���������ʸ���ɰ���״������Ӧ�������ͼƬ�е�Ч�������´�ͼ����ʽ���ڣ�����ӰЧ���еĺ�ɫ�����ɺ�ɫ��


Step 23
Set the foreground color at black, pick the Rectangle Tool, create a 10 by 15px vector shape and place it as shown in the first image. Return to "gridline every 1px". Again, simply go to Edit > Preferences > Guides, Grid & Slices and enter 1 in the Gridline Every box. Make sure that the little, black rectangle is still selected and focus on the top bar. Check the Add button and add a 4 by 15px shape as shown in the second image. Open the Layer Style window for this new vector shape and enter the properties shown in the following image.
��ǰ��ɫ����Ϊ��ɫ��ѡ����ι��ߣ�����һ��10����15px��ʸ����״�������������ͼ1����ʾ��λ�á��ָ����������1px�ġ���ͬ��ֻ��ȥ�༭>��ѡ��>�ο��ߣ��������Ƭ�����������ߵ�ÿ��ѡ���������1��ȷ��һ�㣬��ɫ�����Դ���ѡ��״̬�����۲춥���������Add��ť������һ��4����15px����ͼ����ʾ����״��������µ�ʸ����״��ͼ����ʽ���ڣ�Ȼ����������ͼ��ʾ�����ԡ�


Step 24
Select the vector shape edited in the previous step and duplicate it (Control + J). Focus on the Layers panel and select this copy. Clear the Layer Style, lower its Fill to 0% then open the Layer Style window and enter the properties shown in the following image.
ѡ������һ���༭��ʸ����״����������������+ J�����鿴ͼ������ϣ�ѡ��������������ͼ����ʽ�����������Ϊ0����Ȼ���ͼ����ʽ���ڣ���������ͼ��ʾ�����ԡ�


Step 25
Focus on the shape made in the previous step. Pick the Ellipse Tool, create a 4 by 31px vector shape and place it as shown in the first image. Send it to back (Shift + Control + [ ) then open the Layer Style window and enter the properties shown in the following images.
�鿴��֮ǰ��������������״��ѡ����Բ���ߣ�����һ��4����31px��ʸ����״�����������ͼ1����ʾ��λ�á����õ��ײ㣨��Shift+Control + [����Ȼ���ͼ����ʽ���ڣ�������ͼ�е����ԡ�


Step 26
Pick the Rectangle Tool, create an 8 by 31px vector shape and place it as shown in the first image. Make sure that this new shape stays selected and switch to the Ellipse Tool. Check the Add button from the top bar and add a 4 by 31px vector shape as shown in the second image. Continue with the Ellipse Tool, check the Subtract button from the top bar and add a 4 by 31px vector shape as shown in the third image. Send this vector shape to back then open the Layer Style window and enter the properties shown in the following images.
ѡ����ι��ߣ�����һ��8��31px��ʸ����״�������������ͼ1����ʾ��λ�á�ȷ����һ�µ���״����ѡ��״̬���л�����Բ���ߡ����������ĺϲ���״��ť������һ��ͼ���е�4��31px��ʸ����״����������Բ���ߣ����������ļ�ȥ������״��ť������һ��ͼ���е�4��31px��ʸ����״�������ʸ����״���ں�һ��Ȼ���ͼ����ʽ���ڣ�������ͼ�е����ԡ�


Step 27
Next, you need to create your own simple pattern. First, hit Control + N to create a new document. Enter 2 in the width and height boxes and click OK. Make sure that the Grid and the Snap to Grid are enabled then delete the "Background" layer. Set the foreground color at black and grab the Rectangle Tool. Create a 2 by 1px vector shape and place it as shown in the following image. Now, simply go to Edit > Define Pattern. Pick a name for your pattern, click OK and you got your pattern. Close this document and return to the first one.
������������Ҫ�Լ�����һ����ͼ�������ȣ����Control + N����һ�����ĵ����ڿ��Ⱥ߶ȿ�������2��Ȼ��ȷ����ȷ������������Ͷ��������ܣ�Ȼ��ɾ����������ͼ�㡣����ǰ��ɫΪ��ɫ��ѡ����ι��ߣ�����һ��2��1px��ʸ����״�������������ͼ����ʾ��λ�á����ڣ�ֻ��ȥ�༭>����ͼ������д���ͼ�����ƣ�����ȷ�����㴴�����Լ���ͼ���ˡ��رո��ļ��������ص���һ���ļ���(ע��Ӧ�����ȴ������ι�����ɾ������ͼ��ɣ�

Step 28
Move to the Layers panel, right click on the vector shape made in the twenty-sixth step and click on Covert to Smart Object. Select this new smart object, open the Layer Style window and enter the properties shown in the following images.
�ƶ���ͼ������У��Ҽ������ڵڶ�ʮ�����д�����ʸ����״��Ȼ��ת��Ϊ���ܶ���ѡ������µ����ܶ���ͼ����ʽ���ڣ�Ȼ��������ͼ�е����ԡ�


Step 29
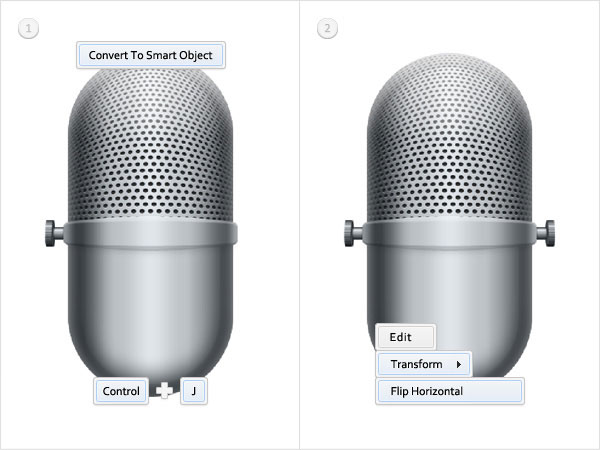
Select the smart object and the vector shapes made in the last six steps and convert them to a single smart object. Make a copy of this new smart object (Control + J), select it and go to Edit > Transform > Flip Horizontal. Make sure that this copy is still selected, drag it to the right and place it as shown in the second image.
ͬʱѡ�����ܶ����������������ʸ��ͼ�Σ�������ת��Ϊһ�����ܶ�������µ����ܶ���һ��������Control + J����ѡ����������༭>�任>ˮƽ��ת����ȷ���˸����Դ���ѡ��״̬�������϶����ұߣ��������������ͼ2����ʾ��λ�á�
Step 30
Switch to "gridline every 5px" and focus on the bottom side of the shapes created so far. Pick the Rectangle Tool, create a 25 by 100px vector shape and place it as shown in the first image. Select it, focus on the bottom side and switch to the Ellipse Tool. Check the Add button from the top bar then add a 25 by 10px vector shape as shown in the second image. Open the Layer Style window for this new vector shape and enter the properties shown in the following images.
�л�����5��5���ص�������ͼ�ƶ���Ŀǰ��������״���·���ѡ����ι��ߣ�����һ��25��100px��ʸ����״�������������ͼ1����ʾ��λ�á�ѡ��������ͼ�ƶ��������·������л�����Բ���ߡ��Ӷ���������ϲ���״��ť��Ȼ������һ��ͼ����25��10px��ʸ����״��������µ�ʸ����״ͼ����ʽ���ڣ�Ȼ��������ͼ�е����ԡ�


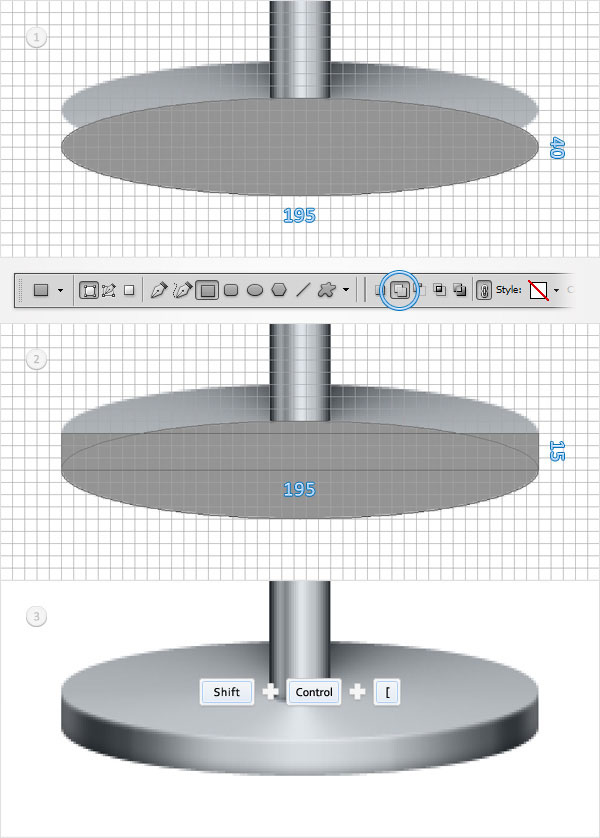
Step 31
Focus on the bottom side of the vector shape made in the previous step. Pick the Ellipse Tool, create a 195 by 40px vector shape and place it as shown in the first image. Send it to back (Shift + Control + [ ) then open the Layer Style window and enter the properties shown in the following images.
��ͼ�ƶ���ǰ������������ʸ����״���·���ѡ����Բ���ߣ�����һ��195��40PXʸ����״�������������ͼ1����ʾ��λ�á��ŵ��ײ㣨��Shift+ Control +[ ����Ȼ���ͼ����ʽ���ڣ�������ͼ�е����ԡ�


Step 32
Pick the Ellipse Tool, create a 195 by 40px vector shape and place it as shown in the first image. Select this new vector shape and switch to the Rectangle Tool. Check the Add button from the top bar and add a 195 by 15px vector shape as shown in the second image. Make sure that this vector shape is still selected, send it to back (Shift + Control + [ ) then open the Layer Style window and enter the properties shown in the following images.
ѡ����Բ���ߣ�����һ��195��40PXʸ����״�������������ͼ1����ʾ��λ�á�ѡ������µ�ʸ����״���л������ι��ߡ����������ĺϲ���״��ť������һ��ͼ2�е�195��15px��ʸ����״����ȷ����ʸ����״�Դ���ѡ��״̬�����õ��ײ㣨��Shift+ Control + [����Ȼ���ͼ����ʽ���ڣ�������ͼ�е����ԡ�


Step 33
Return to "gridline every 1px" and focus on the top side of the vector shape made in the thirtieth step. Pick the Ellipse Tool, create a 25 by 6px vector shape and place it as shown in the following image. Open the Layer Style window for this new vector shape and enter the properties shown in the following images.
���ص���1��1���ص�������ͼ�ƶ�������ʮ��������ʸ����״���Ϸ���ѡ����Բ���ߣ�����һ��25��6pxʸ����״�������������ͼ����ʾ��λ�á�������µ�ʸ����״��ͼ����ʽ���ڣ�������ͼ�е����ԡ�(ע��ԭ�̳�����һ�Ž��������ͼ����ҿ����Լ�����ǰ��ѧϰ���Ľ��䷽�������ŵ�һ�£����Բο�����Ĵ�Բ�Ľ��䷽ʽ����Ҫֱ�Ӹ���Ŷ���Dz�һ���ġ���


Step 34
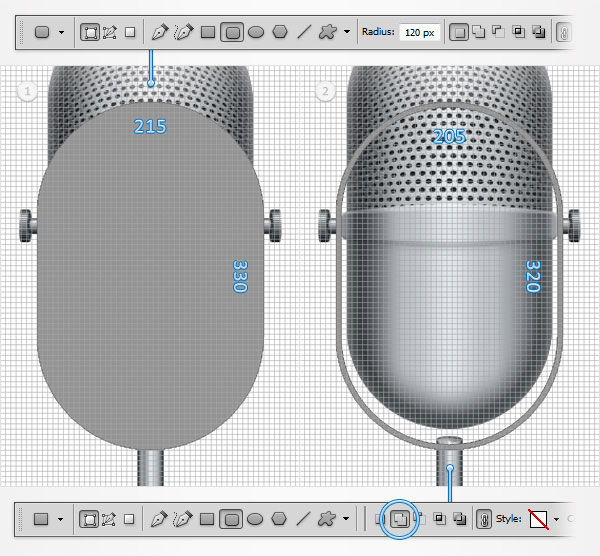
Switch to "gridline every 5px". Pick the Rounded Rectangle Tool, set the radius at 120px, create a 215 by 330px vector shape and place it as shown in the first image. Select this new vector shape, check the Subtract button from the top bar and draw a 205 by 320px vector shape as shown in the second image.
�л�����5��5���ص�������Բ�Ǿ��ι��ߣ�����Բ�ǰ뾶Ϊ120px������һ��215��330pxʸ����״�������������ͼ1����ʾ��λ�á�ѡ������µ�ʸ����״�����������ļ�ȥ������״��ť������һ����ͼ����205��320px��ʸ����״��(ע��ͼ�а�ť��ע���ˣ�
Step 35
Select the vector shape made in the previous step and grab the Rectangle Tool. Check the Subtract button from the top bar and draw a 215 by 125px vector shape as shown in the following image.
ѡ������һ���Ƴɵ�ʸ����״����ѡ����ι��ߡ����������ļ�ȥ������״��ť�����Ƴ�215��125pxʸ����״������ͼ��ʾ��

Step 36
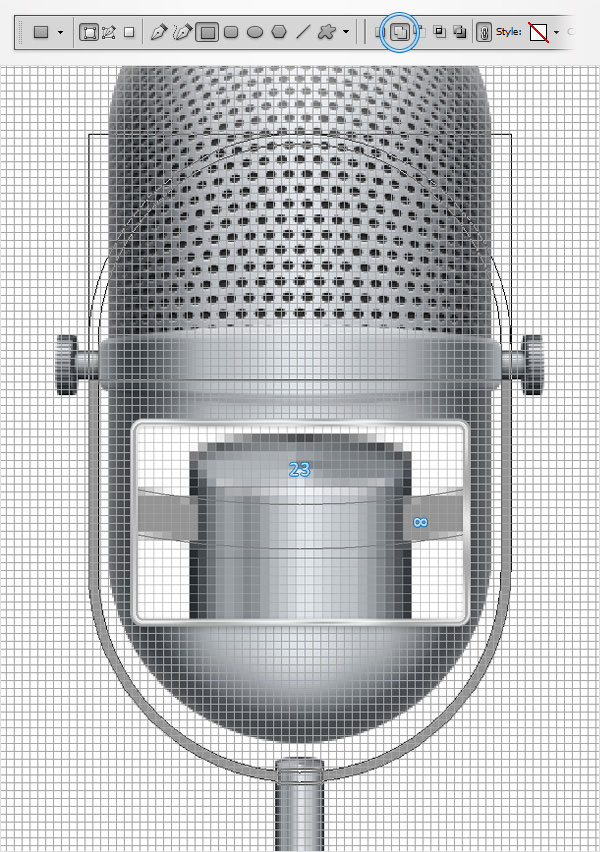
Return to "gridline every 1px". Select the vector shape edited in the previous step, pick the Rectangle Tool and focus on the bottom side. Check the Subtract button from the top bar and draw a 23 by 8px vector shape as shown in the following image.
���ص���1��1���ص�����ѡ������һ���༭��ʸ����״��ѡ����ι��ߣ���ͼ�ƶ����·������������ļ�ȥ������״��ť�����Ƴ�23��8���ص�ʸ����״������ͼ��ʾ��
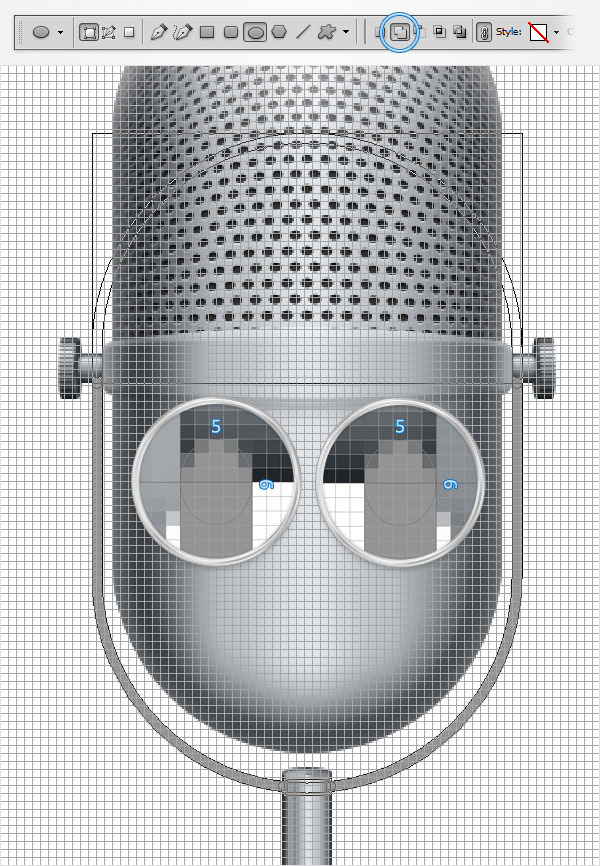
Step 37
Select the vector shape edited in the previous step, pick the Ellipse Tool and focus on the bottom side. Check the Add button from the top bar and add two, 5px circles as shown in the following image.
ѡ������һ���༭��ʸ����״��ѡ����Բ���ߣ���ͼ�ƶ����·������������ĺϲ���״��ť������������5px��ԲȦ������ͼ��ʾ��

Step 38
Select the vector shape edited in the previous step, pick the Ellipse Tool and focus on the top side. Check the Add button from the top bar and add two, 5 by 6px vector shapes as shown in the following image.
ѡ������һ���༭��ʸ����״��ѡ����Բ���ߣ���ͼ�ƶ����Ϸ������������ĺϲ���״��ť������������5��6px��ԲȦ������ͼ��ʾ��
Step 39
Reselect the vector shape made in the last five step and turn it into a smart object. Open the Layer Style window for this new smart object and enter the properties shown in the following images.
����ѡ�����岽������ʸ��ͼ�Σ�������ת�������ܶ�������µ����ܶ����ͼ����ʽ���ڣ�Ȼ��������ͼ�е����ԡ�


Step 40
Focus on the bottom side of the smart object made in the previous step. Set the foreground at white, pick the Ellipse Tool, create two, 5px circles and place them as shown in the first image. Open the Layer Style window for the left circles and enter the properties shown in the following image. Open the Layer Style window for the right circle, enter the same properties shown in the following image, but inverse the angle.
��ͼ�ƶ���ǰ�������������ܶ���ĵײ�������ǰ��ɫΪ��ɫ��ѡ����Բ���ߣ���������5px��ԲȦ�������������ͼ1����ʾ��λ�á������ԲȦ��ͼ����ʽ���ڣ�Ȼ��������ͼ�е����ԡ����ұ�ԲȦͼ����ʽ���ڣ�Ȼ��������ͼ�е����ԣ��������෴�ĽǶȡ�


Step 41
Focus on the top side of the smart object made in the thirty-ninth step and pick the Ellipse Tool. Create two, 5 by 6px vector shapes and place them as shown in the first image. Open the Layer Style window or these new shapes and enter the properties shown in the following image.
��ͼ�ƶ�������ʮ�Ų��е����ܶ���Ķ�������ѡ����Բ���ߡ�����2��5��6px��ʸ����״�����������ͼ1����ʾ��λ�á�����Щ�µ���״��ͼ����ʽ���ڣ�Ȼ����������ͼ��ʾ�����ԡ�


Step 42
Next, we��ll play a little with the color of the microphone. Select all the shapes created so far and convert them to a smart object. Make a copy of this smart object (Control + J) and select it. Lower its Fill to 0% then open the Layer Style window and enter the properties shown in the following image.
�����������ǽ�����˷��һ����ɫ��ѡ�����д�������״������ת��Ϊ���ܶ���������ܶ���һ��������Control+ J������ѡ�����������������Ϊ0����Ȼ���ͼ����ʽ���ڣ���������ͼ��ʾ�����ԡ�

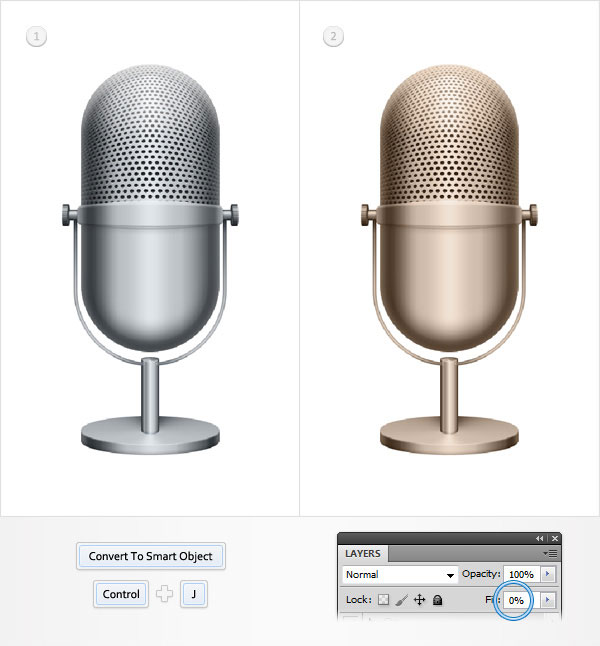
Step 43
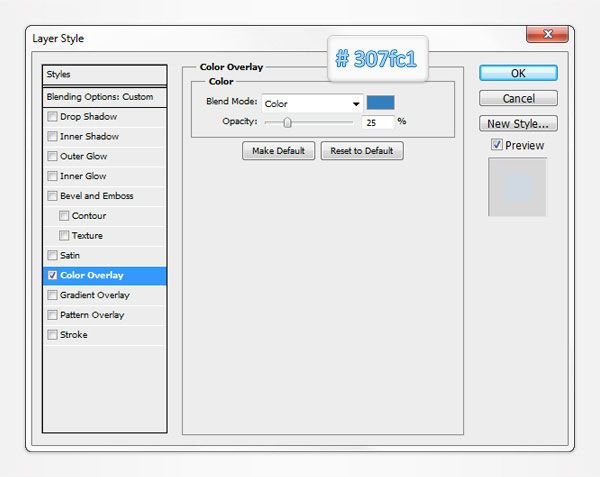
Select the second smart object made in the previous step and duplicate it (Control + J). Select this copy, open the Layer Style window and edit the properties used for the Color Overlay as shown in the following image.
ѡ�����ϸ��IJ����еĵڶ������ܶ���������Control + J����ѡ�������������ͼ����ʽ���ڣ��༭����ͼ��ʾ��ɫ���ӵ����ԡ�

Step 44
Create a new layer (Shift + Control + Alt + N) and send it to back (Shift + Control + [ ). Focus on the Layers panel and make sure that this new layer is selected. Set the foreground color at #2d2d2d, pick the Paint Bucket Tool and simply click inside your artoard.
����һ����ͼ�㣨ͬʱ��סShift+ Control + Alt + N�����������ŵ�ͼ������ͬʱ��סShift+ Control + [�����鿴ͼ����壬��ȷ��ѡ�������ͼ�㡣����ǰ��ɫΪ��2d2d2d��ѡ������Ͱ������ͼ���ڵ����

Step 45
Finally, select the smart objects that make up your microphone and turn them into a new smart object. Select it and go to Filter > Noise > Add Noise. Enter the properties shown in the following image, click OK and go to Filter > Render > Lens Flare. Enter the properties shown below, click OK and you��re done.
���ѡ����Щ���ܶ���������˷���һ���µ����ܶ���ѡ������ȥ�˾�>��ɫ>������ɫ����������ͼ��ʾ�����ԣ�����OK��ȥ�˾�>��Ⱦ>��ͷ���Ρ�������ͼ��ʾ�����ԣ����ȷ�����ʹ���ˡ�

And We��re Done!
Here is how your final result should look.
�������Ǵ���ˣ�
��������������Ӧ�ÿ��������ӡ�
��������ͼ�������Ž̳���ɵ�

�������úò�Ҫ���˵��ޣ����ǵ�֧���������Ķ�����
Copyright © 2008-2020 uimaker.com / ��ICP��09003079��-1